Your Questions Answered
“There’s so much dust on top of the refrigerator, but it feels wasteful to leave that space empty.”
“My cabinets don’t reach the refrigerator top, and now there’s this awkward gap.”
“I want to use that space, but I can’t reach it easily!”
“I put things up there and completely forget about them until they expire.”
Do any of these sound familiar? As a kitchen designer and professional organizer, I hear these concerns from clients almost every week. The space on top of your refrigerator represents about 0.5 to 1 square meter of valuable storage real estate that most homeowners either ignore or misuse.
Here’s the truth: Properly utilizing this space can increase your kitchen storage capacity by 15-20%. In this guide, I’ll help you diagnose your specific situation, provide 3-5 practical solutions, and help you avoid the common design pitfalls I see repeatedly in my practice.

What's Your Refrigerator Top Problem?
Before we jump into solutions, let’s identify which category your situation falls into. This will help you choose the most effective approach.
Type A: Completely Unused Space
Symptoms: Your refrigerator top is empty or just has old cardboard boxes sitting there collecting dust.
Why it happens: You’re unsure what to store there, or you’re worried about accessibility.
The cost: You’re wasting 100% of available storage space.
Type B: Random Clutter
Symptoms: Items are piled haphazardly, and you can never find what you need.
Why it happens: No organization system or proper storage containers.
The cost: You’re only using about 30% of the space effectively.
Type C: Overloaded
Symptoms: Too many items stacked precariously, creating safety hazards.
Why it happens: Insufficient storage elsewhere, or lack of planning.
The risk: Items falling, difficulty cleaning, and potentially blocking refrigerator ventilation.
Type D: Design Mismatch
Symptoms: Your cabinets and refrigerator heights don’t match, leaving an awkward gap.
Why it happens: Poor planning during kitchen renovation.
The reality: This requires more work to fix, but solutions exist.
Quick Self-Assessment
Ask yourself:
- Is your refrigerator top higher than 170cm (5’7″)?
- Do you have safe tools to access items stored there?
- How often do you actually use items stored on top?
- Is your refrigerator’s heat ventilation blocked?
Why it happens: Poor planning during kitchen renovation.
The reality: This requires more work to fix, but solutions exist.
Designer's Warning: 5 Cabinet Design Mistakes to Avoid
Mistake #1: Measurement Errors
What I see constantly: Clients buy the refrigerator first, then try to fit cabinets around it. The result? A 10-15cm gap that’s too narrow for storage but too wide to ignore.
My professional advice:
- Finalize your refrigerator model and exact dimensions before installing cabinets
- The gap should be either ≥40cm (enough for storage bins) or ≤5cm (completely enclosed)
- Avoid the “in-between” height that serves no purpose
Mistake #2: Ignoring Weight Capacity
The problem: Installing heavy cabinets directly on top of the refrigerator, or using cheap hardware that warps over time.
What you should do:
- The refrigerator top itself should hold no more than 10kg
- If installing cabinets, they MUST be anchored to the wall, not the refrigerator
- Invest in quality hinges and tracks (minimum 15kg weight capacity)
Mistake #3: Blocking Ventilation
Common scenario: Cabinets completely seal the refrigerator top with no ventilation gaps, or too many items covering heat vents.
The fix:
- Leave at least 5-10cm clearance at the top and back for heat dissipation
- Use ventilated grill designs or perforated panels
- Regularly check ventilation (you should feel warmth when the compressor runs)
Mistake #4: Inaccessible Design
What goes wrong: Cabinets installed too high requiring a ladder, doors that swing out in tight kitchens, or no lighting inside dark cabinets.
Better solutions:
- Install pull-down or sliding door cabinets
- Use a grabber tool for easy retrieval
- Add motion-sensor LED strips (costs only $15-30)
Mistake #5: Lack of Overall Planning
The issue: The refrigerator top storage doesn’t match your existing cabinet style, creating a visual mess.
Think holistically:
- Design with the “whole kitchen” concept in mind
- Choose removable, adjustable storage solutions
- Plan for future appliance replacements

The Professional Organizer's 5 Golden Rules
Rule #1: Zone Your Storage Appropriately
What SHOULD go on top of your refrigerator: ✅ Low-frequency items (seasonal kitchenware) ✅ Lightweight items (plastic containers, paper goods) ✅ Backup inventory (unopened pantry items, consumables)
What should NEVER go up there: ❌ Daily-use items ❌ Fragile items (glass jars, bottles) ❌ Fresh food or refrigerated items ❌ Heavy items (over 5kg each) ❌ Valuables or important documents
Rule #2: Standardize Your ContainersStorage Appropriately
My recommendation:
- Use uniform-sized transparent storage bins
- Ideal dimensions: 30-40cm length × 20-30cm width × 15-20cm height
- Choose bins with handles for easy retrieval
- Label everything clearly (item name + expiration date)
Trusted brands: IKEA SAMLA series, Muji PP storage boxes, or Lock & Lock containers.
Rule #3: Visual Management System
Implementation:
- Take photos of what’s stored on top
- Create a checklist in your phone
- Set quarterly calendar reminders to review
- Use transparent or semi-transparent containers so you can see contents
Rule #4: First In, First Out (FIFO)
Prevent waste:
- Place newly purchased items toward the back
- Keep older items in front to use first
- Check expiration dates each time you access the area
- Remove expired items immediately
Rule #5: Regular Decluttering
Maintenance schedule:
- Monthly quick check (10 minutes)
- Quarterly deep organization (30 minutes)
- Seasonal adjustment of stored items
- Immediate removal of unnecessary items
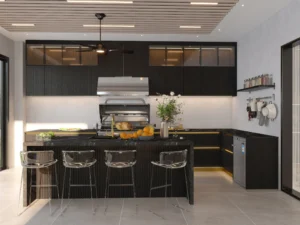
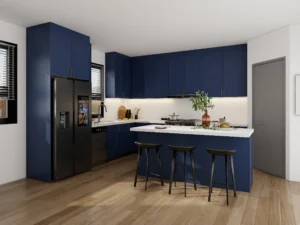
5 Practical Solutions: Choose What Works for You
Solution A: Fully Enclosed Cabinet System ($300-800)
Best for: Those prioritizing aesthetics, with adequate budget and high storage needs.
Key implementation points:
- Custom cabinets matching your existing kitchen style
- Must be wall-mounted to load-bearing structure
- Include adjustable internal shelving
- Choose lift-up or sliding doors to save space
Organization tips:
- Lower level: Monthly-use items
- Upper level: Seasonal items (quarterly access)
- Use storage bins for categorization

Solution B: Open Shelf System ($100-300)
Best for: Budget-conscious homeowners who prefer display storage for infrequently used items.
Implementation:
- Choose solid wood or metal shelves with good weight capacity
- Minimum thickness: 2cm (wood) or 1.5cm (metal)
- Install sturdy L-brackets
- Shelf depth should be 5cm less than refrigerator depth to avoid overhang
Organization tips:
- Use attractive, uniform storage baskets
- Place decorative + functional items
- Dust weekly
- Don’t stack more than 2 containers high

Solution C: DIY Lightweight Storage ($30-100)
Best for: Renters (who can’t modify), extremely tight budgets, or temporary solutions.
Implementation:
- Purchase ready-made storage racks or bins
- Use non-slip mats to prevent sliding
- Secure bins with adhesive strips if needed
- Choose colors coordinating with your kitchen
Organization tips:
- Maximum 2-3 storage bins
- Label each container clearly
- Avoid frequent repositioning
- Take everything with you when you move

Solution D: Smart Lift System ($500-1500)
Best for: Shorter individuals, elderly users, those seeking maximum convenience, or high-end kitchen renovations.
Implementation:
- Choose branded electric lift-down cabinets
- Ensure proper electrical outlet placement
- Weight capacity: 10-15kg
- Remote or touch control operation
Organization tips:
- Suitable for medium-frequency items
- Don’t overload (protects motor lifespan)
- Regular mechanical maintenance
- Teach all household members how to operate

Solution E: Hybrid Approach ($200-500)
Best for: Those balancing aesthetics and functionality with moderate budgets and flexibility needs.
Implementation:
- Install small cabinets on one side (private items)
- Open shelving on the other side (display items)
- Leave center space for ventilation
- Use mobile storage units
Organization tips:
- Enclosed area: Cleaning supplies, backup stock
- Open area: Decorative items, frequently used seasonings
- Regularly adjust balance between sides

Tailored Advice for Different Kitchen Types
Small Kitchens (<6㎡ / 65 sq ft)
Strategy: Maximize vertical space utilization
Every centimeter counts in small kitchens. Your refrigerator top MUST be utilized efficiently. Choose shallow-depth shelves (20-25cm) and store only lightweight, flat items. Keep it visually light with pale colors to avoid a cramped feeling.
Recommended solution: DIY lightweight storage or single open shelf

Open-Plan Kitchens
Strategy: Aesthetics first, maintain order
In open kitchens visible from living areas, appearance matters significantly. Choose enclosed cabinets to hide clutter, or use beautiful matching storage containers. Coordinate with your living room style and avoid random items that create visual chaos.
Recommended solution: Fully enclosed cabinet or hybrid approach

Traditional Closed Kitchens
Strategy: Maximize storage capacity
You have more flexibility here. Choose deeper cabinets without worrying as much about appearance. Prioritize practicality and weight capacity. You can stack multiple layers of items.
Recommended solution: Fully enclosed cabinet system
Kitchens with High Ceilings
Use glass doors with integrated LED strips to add vertical openness.
Keep only lightweight, infrequently used items above the fridge; add pull-down lifts or a rail ladder.
Run tall cabinets to the ceiling for a clean elevation and less dust; keep the manufacturer-required ventilation gap over the fridge.
Recommended: Full-height glass cabinets with LED; top zone for light, seldom-used items; pull-down/ladder access.

Step-by-Step: Organizing Your Refrigerator Top
Step 1: Empty and Assess (30 minutes)
Remove everything currently on top. Clean the surface thoroughly with appropriate cleaner. Sort items into three piles: Keep, Discard, or Relocate. Check expiration dates and item condition.
Step 2: Measure and Plan (15 minutes)
Measure your refrigerator top precisely—height from floor, width, and depth. Note the weight capacity based on your refrigerator manual. Sketch a simple layout plan for zones.
Step 3: Purchase Storage Tools (budget-dependent)
Essential items:
- Storage bins: 2-4 matching containers
- Label maker or adhesive labels
- Non-slip mat to protect refrigerator surface
- Optional: LED light strips, storage racks
Step 4: Categorize and Store (30 minutes)
First Priority (front/most accessible):
- Items used 1-2 times monthly
- Seasonal regular-use items
- Backup consumables
Second Priority (middle position):
- Quarterly-use items
- Holiday items
- Backup kitchenware
Third Priority (back):
- Rarely used but can’t discard items
- Long-term inventory
- Manuals and documentation
Step 5: Label and Document (15 minutes)
Label every storage container clearly. Take photos of your complete setup. Create an inventory list in your phone. Set recurring reminders for maintenance.
Step 6: Maintain the System (ongoing)
Return items to their designated spots after use. Conduct monthly quick checks. Perform quarterly deep organization. Remove expired items promptly.
FAQs
Q1: "I'm only 155cm (5'1") tall. How can I reach the refrigerator top?"
- Invest in a stable folding step stool ($20-40) with wide base and non-slip features
- Store only truly rare-use items to minimize access frequency
- Consider an electric lift system if budget allows
Q2: "The refrigerator top gets so dusty. How do I keep it clean?"
- Use removable silicone mats or dust covers ($10-20)
- Monthly cleaning with vacuum + slightly damp cloth
- Place dust covers under storage bins too
- Avoid storing items that shed crumbs or debris
Q3: "I'm renting. Can I make changes?"
Absolutely! Choose damage-free installation:
- Adhesive-mounted storage racks
- Free-standing storage bins (no installation required)
- Portable small shelving units
- Take everything with you when you move
Q4: "Will storing items on top damage my refrigerator?"
Not if you follow these guidelines:
- Keep total weight under 10kg
- Don’t block heat vents (usually at back and top edges)
- Never place liquids that could leak
- Check ventilation regularly
Q5: "My kitchen is already renovated, but the heights don't match. Can I fix it?"
Absolutely. Here’s how:
- Gap 10-20cm: Custom thin drawer cabinet
- Gap 20-40cm: Install shelving + storage bins
- Gap too small (<10cm): Use decorative panel to close it off—don’t force items in
- Gap too large (>40cm): Hire a carpenter for custom supplementary cabinets
Q6: "What exactly should I store up there?"
My professional recommendations:
- ✅ Holiday items (Christmas serving ware, special occasion dishes)
- ✅ Backup paper towels, plastic wrap
- ✅ Infrequently used baking tools
- ✅ Large storage jars for dry goods
- ✅ Guest dishes and utensils
- ✅ Recipe books and appliance manuals
Q7: "Won't open shelving look messy?"
The key is:
- Use containers in a unified style
- Limit to 3 colors maximum
- Maintain organization regularly
- Add 1-2 decorative items as accents
- If you can’t maintain tidiness, choose enclosed cabinets instead
Beyond the Refrigerator Top: Upgrade Your Entire Kitchen Storage
The refrigerator top is just one piece of the puzzle. In my professional experience, truly efficient kitchens optimize these areas too:
- Under-cabinet space (hanging rods, hooks)
- Inside base cabinets (drawer dividers, corner pull-outs)
- Wall space (pegboards, magnetic knife strips)
- Under-sink area (U-shaped drawers, sorting bins)
- Windowsills, corners, and odd spaces
Test Your Kitchen Storage Efficiency:
- Can you find any item within 30 seconds?
- Everything has a designated “home”
- No expired food or long-unused items
- Countertops stay 80% clear
- Opening any cabinet reveals neat organization
If you can’t check 3 or more boxes, it’s time for a comprehensive storage overhaul.
When to Hire a Professional Organizer
Consider professional help if:
- You’re overwhelmed by too many items
- Organization doesn’t stick—chaos returns quickly
- Your kitchen has obvious design flaws
- You need customized solutions
- You want a permanent, one-time fix
Good Storage Starts with Good Design
The space on top of your refrigerator is underestimated real estate. Through years of consulting with homeowners, I’ve learned that proper planning prevents problems. Good organization requires systems thinking, not just buying more containers.
Remember: The best solution is the one that works for YOUR specific situation. Don’t blindly copy someone else’s setup. Safety always comes first. Regularly evaluate and adjust your approach. Seek professional help when needed.
Take Action This Weekend:
- Assess your current situation (30 minutes)
- Research and decide on your solution (1 hour)
- Purchase necessary tools (budget $50-200)
- Implement organization (2-3 hours)
- Establish maintenance habits (15 minutes monthly)
As both a designer and organizer, I’ve seen too many storage frustrations caused by poor planning. A well-designed kitchen should make life easier, not harder. This small space on top of your refrigerator, when handled properly, can significantly boost your kitchen’s efficiency.
The key message: Good kitchen design should simplify your life, not complicate it. With the right approach, that often-ignored space above your refrigerator can transform your kitchen storage capacity.